昨晚做了一个梦,梦见大家族聚会,有在世的也有离世的,可惜我叫错了长辈的名字。穿过长廊,坐在大厅里,周围幕布拉开,一条长长的铁轨从远方一路过来又延伸到另一端的远方,一大块翠绿的平原将卧轨和远处的高山连接了起来,视野极度舒展,有马群、羚羊之类的动物在自由的奔跑,其中有一匹高大的淡黄色的骏马一跃而起,跳的非常高,非常有力,非常……叮叮当当的蒸汽火车一路行来,遮挡了动物们。我们决定起身,去山的另一头看看。爬过半山腰,尽管未见大海,但感受到了海的气息,进入一片市场,有海鲜,有泳具,然后就醒了。

自解

和家人一起是一种安全感,过程中拿出笨重的iPad贪婪的拍摄美景,为什么不用手机呢?也许远离手机让人变得安静吧。


几年好在外写Blog了,就从这个梦开始继续更新吧

monitorEventLoopDelay 是什么

perf_hooks.monitorEventLoopDelay([options])

  • options: Object
    resolution: The sampling rate in milliseconds. Must be greater than zero. Default: 10.
  • Returns: Histogram

    Creates a Histogram object that samples and reports the event loop delay over time. The delays will be reported in nanoseconds.
    Using a timer to detect approximate event loop delay works because the execution of timers is tied specifically to the lifecycle of the libuv event loop. That is, a delay in the loop will cause a delay in the execution of the timer, and those delays are specifically what this API is intended to detect.

监控 EventLoop 运行情况是判断系统是否健康的重要指标之一,如果有大量的延迟,说明系统存在密集计算,降低了系统的吞吐。Node.js 在 v11 版本引入了monitorEventLoopDelay,而之前需要自己去实现。
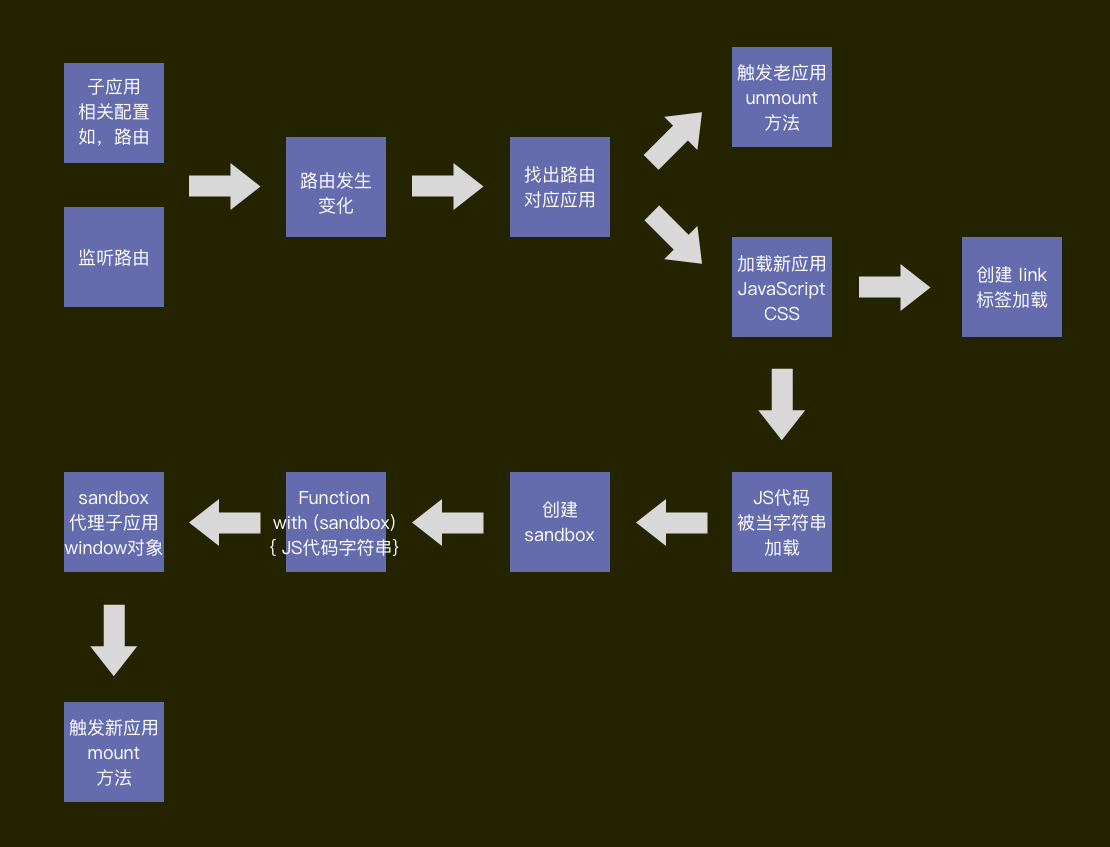
Read More

libuv 在 v1.36.0 之后移除了 gyp_uv.py (commit),没办法通过它去创建一个 libuv.a 静态链接库(v1.35 文档有详细的介绍),现在我们需要通过cmake去创建。

构建静态链接库

1
2
3
4
5
6
7
// 下载 libuv
git clone https://github.com/libuv/libuv
cd libuv
mkdir -p build
// DCMAKE_BUILD_TYPE 将其设置为 Debug 模式,不然断点没办法进入 libuv 源码中
(cd build && cmake -DCMAKE_BUILD_TYPE=Debug ..)
cmake --build build

之后 build 目录 如下,libuv_a.a 就是我们需要的 静态链接库。
build dir

新建 hello world 项目

通过 CLion 创建一个helloworld项目,在 CMakeLists.txt 里添加 libuv 相关的信息,将 libuv 的头文件和源码添加进来,最后把项目和 linuv 链接在一起

1
2
3
4
5
6
7
8
9
10
11
12
13
14
15
16
17
cmake_minimum_required(VERSION 3.17)
project(helloworld)
add_executable(helloworld main.cpp)

# 前面 clone libuv 绝对路径
set(LIBUVDIR /your/libuv/path)
# 将源码导入
include_directories(${LIBUVDIR}/src)
include_directories(${LIBUVDIR}/include)

add_library(libuv STATIC IMPORTED)
set_target_properties(libuv
PROPERTIES IMPORTED_LOCATION
${LIBUVDIR}/build/libuv_a.a)

# 链接起来
target_link_libraries(helloworld libuv)

创建 main.cpp 文件

1
2
3
4
5
6
7
8
9
10
11
12
13
14
15
16
17
18
#include <stdio.h>
#include <uv.h>

static void cb(uv_write_t *req, int status) {
printf("Hello from Callback.\n");
}

int main() {
uv_tty_t tty;
uv_write_t req;
uv_tty_init(uv_default_loop(), &tty, 1, 0);
char str[] = "Hello UV!\n";
int len = strlen(str);
uv_buf_t bufs[] = {uv_buf_init(str, len)};
uv_write(&req, (uv_stream_t *) &tty, bufs, 1, cb);
uv_run(uv_default_loop(), UV_RUN_DEFAULT);
return 0;
}

之后就能愉快的打断点调试 libuv 了
debug libuv

学习 libuv 或者其它 C/C++相关的技术,感觉又回到了刚开始学习编程的时候,很多的不懂和挑战,不再像用 JavaScript 那样随心所欲,但是越是对底层的学习,越是能了解计算机原理,职业寿命才能变得更长。出于兴趣也好,出于无奈也好,总之新的学习让一切又变得有意思起来。

Your browser is out-of-date!

Update your browser to view this website correctly. Update my browser now

×