在网络上查询libuv 和EventLoop相关信息的时候,经常看到不同的文章所表达的意思差距较多,主要原因有二吧:
它们的libuv和V8大版本不同,导致具体的实现略有差异
另外它们的代码错综复杂,又是大多数JavaScript工作者不擅长的C/C++,只是从上而下的看,或许一些细节无法完全理解或是认知的分歧
与其受他人影响,不如自己来好好梳理下。
版本
1 2 3 4 5 6 7 8 9 10 11 12 13 14 15 #define UV_VERSION_MAJOR 1 #define UV_VERSION_MINOR 33 #define UV_VERSION_PATCH 1 #define V8_MAJOR_VERSION 7 #define V8_MINOR_VERSION 8 #define V8_BUILD_NUMBER 279 #define V8_PATCH_LEVEL 17 #define NODE_MAJOR_VERSION 14 #define NODE_MINOR_VERSION 0 #define NODE_PATCH_VERSION 0
没有列出具体版本号的代码分析都是耍流氓,2010年的代码和2020年的代码可能差距甚远,“上古”分析固然在当时是对的,但是在今日也许是错误的。
libuv & EventLoop文档比较
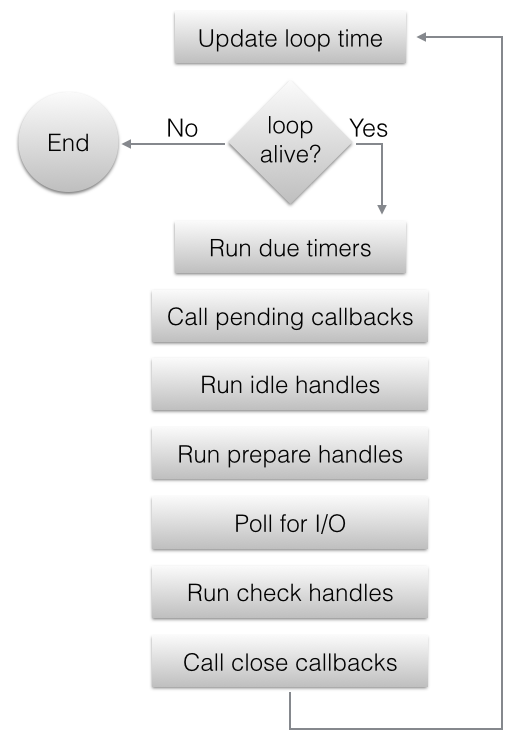
上图出自libuv的The I/O loop 介绍,具体的信息可以看其文档。
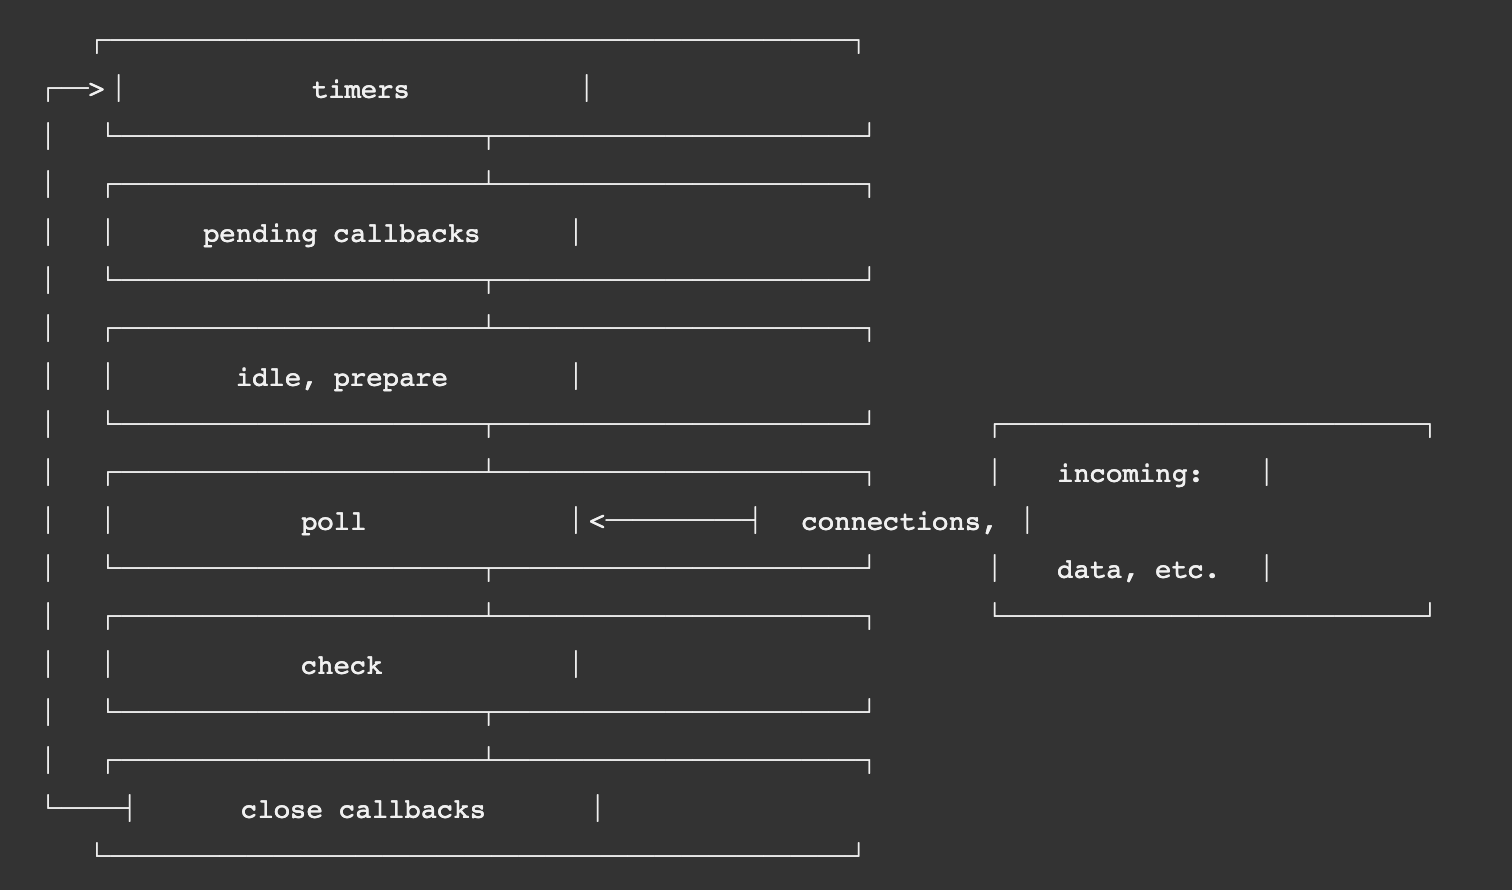
上图出自Event Loop Explained ,两者的各个阶段基本是对应的。哪怕是很多其它自行画的图解中,也基本差不多,但唯独pending callbacks阶段,我看到很多文章里面把它标为I/O callbacks,不知道是不是历史原因,但是就从二者的目前文档解释来看是不妥的。
Pending callbacks are called. All I/O callbacks are called right after polling for I/O, for the most part. There are cases, however, in which calling such a callback is deferred for the next loop iteration. If the previous iteration deferred any I/O callback it will be run at this point. —— libuv
libuv 里的pending callbacks:大多数的I/O callbacks应该在polling阶段完成,有部分会被延迟到下一个pending callbacks阶段执行。
This phase executes callbacks for some system operations such as types of TCP errors. For example if a TCP socket receives ECONNREFUSED when attempting to connect, some *nix systems want to wait to report the error. This will be queued to execute in the pending callbacks phase. —— Node.js
Node.js 里的pending callbacks:这个阶段会执行系统上因一些错误而引起的callbacks,如TCP错误。
我觉得pending callbacks比较合理,一方面如libuv所说,它是一部分延迟的I/O回调,在Node.js里面指的是一些系统上的错误(这些错误也是I/O引起的)。而大多数的I/O操作其实是在 poll阶段。
libuv的大致流程代码 1 2 3 4 5 6 7 8 9 10 11 12 13 14 15 16 17 18 19 20 21 22 23 24 25 26 27 28 29 30 31 32 33 34 35 36 37 38 39 40 41 42 43 44 45 46 47 48 int uv_run (uv_loop_t * loop, uv_run_mode mode) { int timeout; int r; int ran_pending; r = uv__loop_alive(loop); if (!r) uv__update_time(loop); while (r != 0 && loop->stop_flag == 0 ) { uv__update_time(loop); uv__run_timers(loop); ran_pending = uv__run_pending(loop); uv__run_idle(loop); uv__run_prepare(loop); timeout = 0 ; if ((mode == UV_RUN_ONCE && !ran_pending) || mode == UV_RUN_DEFAULT) timeout = uv_backend_timeout(loop); uv__io_poll(loop, timeout); uv__run_check(loop); uv__run_closing_handles(loop); if (mode == UV_RUN_ONCE) { uv__update_time(loop); uv__run_timers(loop); } r = uv__loop_alive(loop); if (mode == UV_RUN_ONCE || mode == UV_RUN_NOWAIT) break ; } if (loop->stop_flag != 0 ) loop->stop_flag = 0 ; return r; }
上述uv_run方法同样表达了之前图的循环流程,接下来我们看看各个阶段的具体执行方法。
1 2 3 4 5 6 7 8 9 10 11 12 13 14 15 16 17 18 19 void uv__run_timers (uv_loop_t * loop) { struct heap_node * heap_node ; uv_timer_t * handle; for (;;) { heap_node = heap_min(timer_heap(loop)); if (heap_node == NULL ) break ; handle = container_of(heap_node, uv_timer_t , heap_node); if (handle->timeout > loop->time) break ; uv_timer_stop(handle); uv_timer_again(handle); handle->timer_cb(handle); } }
timers里存放的事件都是最小堆的数据结构排列的,不断的取出根节点比较当前的loop->time就能知道是执行还是退出,那么这里的handle->timer_cb是我们平时JavaScript里的setTimeout回调吗? 后续解答
1 2 3 4 5 6 7 8 9 10 11 12 13 14 15 16 17 18 19 20 static int uv__run_pending (uv_loop_t * loop) { QUEUE* q; QUEUE pq; uv__io_t * w; if (QUEUE_EMPTY(&loop->pending_queue)) return 0 ; QUEUE_MOVE(&loop->pending_queue, &pq); while (!QUEUE_EMPTY(&pq)) { q = QUEUE_HEAD(&pq); QUEUE_REMOVE(q); QUEUE_INIT(q); w = QUEUE_DATA(q, uv__io_t , pending_queue); w->cb(loop, w, POLLOUT); } return 1 ; }
libuv里面事件很多是由双向链表构建而成,等着被一个个执行,双向链表的好处就是插入很容易。
1 2 3 4 5 6 7 8 9 10 11 12 13 14 15 16 17 18 #define UV_LOOP_WATCHER_DEFINE(name, type) \ void uv__run_##name(uv_loop_t* loop) { \ uv_##name##_t* h; \ QUEUE queue; \ QUEUE* q; \ QUEUE_MOVE(&loop->name##_handles, &queue); \ while (!QUEUE_EMPTY(&queue)) { \ q = QUEUE_HEAD(&queue); \ h = QUEUE_DATA(q, uv_##name##_t, queue); \ QUEUE_REMOVE(q); \ QUEUE_INSERT_TAIL(&loop->name##_handles, q); \ h->name##_cb(h); \ } \ } UV_LOOP_WATCHER_DEFINE(prepare, PREPARE) UV_LOOP_WATCHER_DEFINE(check, CHECK) UV_LOOP_WATCHER_DEFINE(idle, IDLE)
UV_LOOP_WATCHER_DEFINE宏直接初始化了prepare、check和idle3个阶段,都是双向链表。
1 2 3 4 5 6 7 8 9 10 11 12 13 14 15 16 17 18 19 20 21 22 23 24 25 26 27 28 29 30 31 32 33 34 35 36 37 38 39 40 41 42 43 44 45 46 47 48 49 50 51 52 53 54 55 56 57 58 59 60 61 62 63 64 65 66 67 68 69 70 71 72 73 74 75 76 77 78 79 80 81 82 83 84 85 86 87 88 89 90 91 92 93 94 95 96 97 void uv__io_poll (uv_loop_t * loop, int timeout) { if (loop->nfds == 0 ) { assert(QUEUE_EMPTY(&loop->watcher_queue)); return ; } while (!QUEUE_EMPTY(&loop->watcher_queue)) { q = QUEUE_HEAD(&loop->watcher_queue); QUEUE_REMOVE(q); QUEUE_INIT(q); w = QUEUE_DATA(q, uv__io_t , watcher_queue); if (w->events == 0 ) op = EPOLL_CTL_ADD; else op = EPOLL_CTL_MOD; epoll_ctl(loop->backend_fd, op, w->fd, &e) w->events = w->pevents; } sigmask = 0 ; if (loop->flags & UV_LOOP_BLOCK_SIGPROF) { sigemptyset(&sigset); sigaddset(&sigset, SIGPROF); sigmask |= 1 << (SIGPROF - 1 ); } base = loop->time; real_timeout = timeout; for (;;) { nfds = epoll_wait(loop->backend_fd, events, ARRAY_SIZE(events), timeout); if (nfds == 0 ) { assert(timeout != -1 ); if (timeout == 0 ) return ; goto update_timeout; } if (nfds == -1 ) { if (errno == ENOSYS) { assert(no_epoll_wait == 0 || no_epoll_pwait == 0 ); continue ; } if (errno != EINTR) abort (); if (timeout == -1 ) continue ; if (timeout == 0 ) return ; goto update_timeout; } have_signals = 0 ; nevents = 0 ; loop->watchers[loop->nwatchers] = (void *) events; loop->watchers[loop->nwatchers + 1 ] = (void *) (uintptr_t ) nfds; for (i = 0 ; i < nfds; i++) { pe = events + i; fd = pe->data.fd; w = loop->watchers[fd]; w->cb(loop, w, pe->events); } if (timeout == 0 ) return ; if (timeout == -1 ) continue ; update_timeout: assert(timeout > 0 ); real_timeout -= (loop->time - base); if (real_timeout <= 0 ) return ; timeout = real_timeout; } }
uv__io_poll里的timeout参数是根据timers里的最近一次定时时间计算出来的。方法内部使用了epoll,是IO多路复用的一个概念。一共有三种:select、poll和epoll。
epoll是Linux内核 为处理大批量文件描述符 而作了改进的poll,是Linux下多路复用IO接口select/poll的增强版本,它能显著提高程序在大量并发连接 中只有少量活跃的情况下的系统CPU 利用率。另一点原因就是获取事件的时候,它无须遍历整个被侦听的描述符集,只要遍历那些被内核IO事件异步唤醒而加入Ready队列的描述符集合就行了。epoll除了提供select/poll那种IO事件的水平触发(Level Triggered)外,还提供了边缘触发(Edge Triggered),这就使得用户空间程序有可能缓存IO状态,减少epoll_wait/epoll_pwait的调用,提高应用程序效率。 ——百度百科
我觉得libuv使用epoll主要是因为支持其自身的异步特点
epoll监控的文件描述符远远大于select/poll
在大量并发的时候epoll性能远远高于select/poll,而少量异步select/poll相对好点。Node.js利用了libuv的高并发特点。
1 2 3 4 5 6 7 8 9 10 11 12 13 static void uv__run_closing_handles (uv_loop_t * loop) { uv_handle_t * p; uv_handle_t * q; p = loop->closing_handles; loop->closing_handles = NULL ; while (p) { q = p->next_closing; uv__finish_close(p); p = q; } }
一个个触发close回调
上述就是libuv各个阶段的大体流程,poll最为复杂,还有很多东西可以留着细品。
Node.js setTimeout 上文中提到那么这里的handle->timer_cb是我们平时JavaScript里的setTimeout回调吗?回答:不是的
看看Node.js里面如何具体实现这个setTimemout方法的
1 2 3 4 5 6 7 8 9 10 11 12 13 14 15 16 17 18 19 20 21 22 23 24 25 26 27 28 29 30 31 32 33 34 35 36 37 38 39 40 41 42 43 44 45 46 function setTimeout (callback, after, arg1, arg2, arg3 ) { var args = [arg1, arg2, arg3]; const timeout = new Timeout (callback, after, args, false ); active (timeout); return timeout; } function Timeout (callback, after, args, isRepeat ) { after *= 1 ; if (!(after >= 1 && after <= TIMEOUT_MAX )) { after = 1 ; } this ._idleTimeout = after; this ._onTimeout = callback; this ._timerArgs = args; } function active (item ) { insert (item, true , getLibuvNow ()); } function insert (item, refed, start ) { let msecs = item._idleTimeout ; if (msecs < 0 || msecs === undefined ) return ; msecs = Math .trunc (msecs); item._idleStart = start; var list = timerListMap[msecs]; if (list === undefined ) { const expiry = start + msecs; timerListMap[msecs] = list = new TimersList (expiry, msecs); timerListQueue.insert (list); if (nextExpiry > expiry) { scheduleTimer (msecs); nextExpiry = expiry; } } L.append (list, item); }
通过上述代码,我们也可以看出JavaScript层面也有一个维护timers的最小堆,并没有吧具体的某个setTimeout注册到V8里面,只是将定时时间告诉了V8scheduleTimer(msecs);,下面是V8相关代码。
1 2 3 4 5 6 7 8 9 10 11 12 13 14 15 16 17 18 19 20 21 22 23 24 25 26 27 28 29 30 31 32 33 34 35 36 37 38 39 40 void ScheduleTimer (const FunctionCallbackInfo<Value>& args) { auto env = Environment::GetCurrent(args); env->ScheduleTimer(args[0 ]->IntegerValue(env->context()).FromJust()); } void Environment::ScheduleTimer (int64_t duration_ms) { if (started_cleanup_) return ; uv_timer_start(timer_handle(), RunTimers, duration_ms, 0 ); } void Environment::RunTimers (uv_timer_t * handle) { Environment* env = Environment::from_timer_handle(handle); Local<Function> cb = env->timers_callback_function(); do { ret = cb->Call(env->context(), process, 1 , &arg); } while (ret.IsEmpty() && env->can_call_into_js()); } int uv_timer_start (uv_timer_t * handle, uv_timer_cb cb, uint64_t timeout, uint64_t repeat) { handle->timer_cb = cb; handle->timeout = clamped_timeout; handle->repeat = repeat; handle->start_id = handle->loop->timer_counter++; heap_insert(timer_heap(handle->loop), (struct heap_node*) &handle->heap_node, timer_less_than); uv__handle_start(handle); return 0 ; }
V8部分注册在timers阶段的是一个C++的回调方法 ,其内部是执行timers_callback_function方法,它从何来来?
1 2 3 4 5 6 7 8 9 void SetupTimers (const FunctionCallbackInfo<Value>& args) CHECK (args[0 ]->IsFunction ()); CHECK (args[1 ]->IsFunction ()); auto env = Environment::GetCurrent (args); env->set_immediate_callback_function (args[0 ].As <Function>()); env->set_timers_callback_function (args[1 ].As <Function>()); }
1 2 3 4 5 6 7 8 9 10 11 12 13 const { setupTaskQueue, queueMicrotask } = require ('internal/process/task_queues' ); const { nextTick, runNextTicks } = setupTaskQueue ();process.nextTick = nextTick; process._tickCallback = runNextTicks; const { getTimerCallbacks } = require ('internal/timers' );const { setupTimers } = internalBinding ('timers' ); const { processImmediate, processTimers } = getTimerCallbacks (runNextTicks);setupTimers (processImmediate, processTimers);
我们通过上述代码看到在node.js里面会将processImmediate和processTimers这两个JavaScript方法注册到对应的C++回调里,之后执行timers_callback_function其实就是执行processTimers方法。
另外,需要注意微任务相关的代码会被带到getTimerCallbacks。
1 2 3 4 5 6 7 8 9 10 11 12 13 14 15 16 17 18 19 20 21 22 23 24 25 26 27 28 29 30 31 32 33 34 35 36 37 38 39 40 41 42 43 44 45 46 47 48 49 50 51 52 53 54 55 56 57 58 59 60 61 62 63 64 65 66 67 68 69 70 71 72 73 74 75 76 77 78 79 80 function getTimerCallbacks (runNextTicks ) { function processImmediate ( } function processTimers (now ) { nextExpiry = Infinity ; let list; let ranAtLeastOneList = false ; while (list = timerListQueue.peek ()) { if (list.expiry > now) { nextExpiry = list.expiry ; return refCount > 0 ? nextExpiry : -nextExpiry; } if (ranAtLeastOneList) runNextTicks (); else ranAtLeastOneList = true ; listOnTimeout (list, now); } return 0 ; } function listOnTimeout (list, now ) { const msecs = list.msecs ; debug ('timeout callback %d' , msecs); var diff, timer; let ranAtLeastOneTimer = false ; while (timer = L.peek (list)) { diff = now - timer._idleStart ; if (diff < msecs) { list.expiry = Math .max (timer._idleStart + msecs, now + 1 ); list.id = timerListId++; timerListQueue.percolateDown (1 ); debug ('%d list wait because diff is %d' , msecs, diff); return ; } if (ranAtLeastOneTimer) runNextTicks (); else ranAtLeastOneTimer = true ; L.remove (timer); const asyncId = timer[async_id_symbol]; if (!timer._onTimeout ) { continue ; } try { const args = timer._timerArgs ; if (args === undefined ) timer._onTimeout (); else timer._onTimeout (...args); } finally { } } if (list === timerListMap[msecs]) { delete timerListMap[msecs]; timerListQueue.shift (); } } return { processImmediate, processTimers }; }
上述代码很长,但是很容易理解,就是根据libuv的时间,将到期的定时任务一一执行了,格外需要注意的是微任务的执行runNextTicks,每次setTimeout的callback之后都会将微任务清空,而不是网上很多文章说的timer阶段之后将微任务清空,这个改动在Node.js 11版本
TimersnextTick queue will be run after each immediate and timer. #22842
具体的原因是希望和浏览器里的行为更为一直,下面的代码在11之前和之后的执行结果略有不同。
1 2 3 4 5 6 7 8 9 10 11 12 13 14 15 16 17 18 19 20 21 22 23 24 25 26 27 28 setTimeout (() => { console .log ('time1' ); Promise .resolve ().then (() => { console .log ('promise1' ); }); }); setTimeout (() => { console .log ('time2' ); Promise .resolve ().then (() => { console .log ('promise2' ); }); });
总结 至此,libuv和Node.js EventLoop关于各个阶段和setTimeout的实现已经做了简单介绍。具体的还是需要看各自版本的代码而定,不能轻易去“相信”网上的介绍,比如最后一个例子就很容易在不同版本出现不同的执行结果。之后,有时间介绍 nextTick的回调实现,这个比较复杂。
Comments